7 Tips Beginners: Getting started in Photography
Photography
2021/03/05
Photography is a very interesting and engaging process. Are you a passionate amateur but struggle with taking absorbing snapshots? To help you with the first steps, 7 photography tips below will help you come to a shoot prepared and confident you can capture those amazing moments.
1. Rule of thirds
The “Rule of thirds” is one of the first and fundamental photography tips that all photographers learn from the beginning, so as it is the basis for vivid and engaging pictures.
Especially, in the process of composing an image, it is highly stipulated that the frame should be divided into nine equal rectangles by four intersecting lines, including two vertical and two horizontal lines. The former intersects the frame into three horizontal sections while the latter cut into three sections vertically.
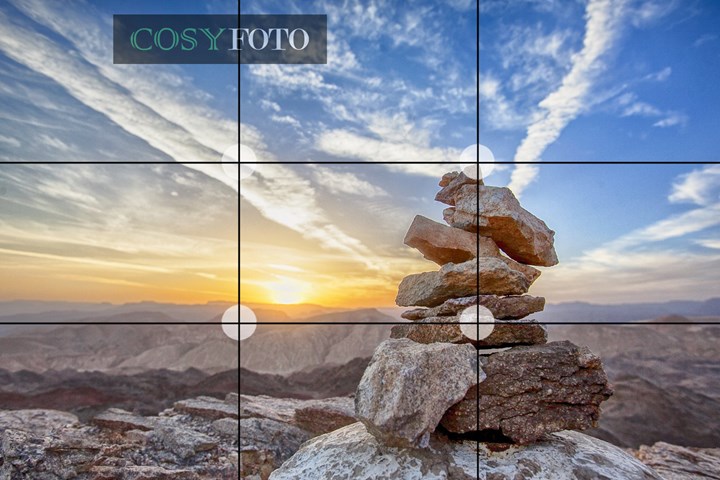
According to the rule, key elements in a particular image are suggested to be situated at the intersection points of those lines, or along them. For instance, a photo is considered to be perfectly in accordance with the Rule of thirds when the person is set to the crossover points in the left or in the right third. Photographic specialists have made a claim that this is an easy and effective way to emphasize the subjects and make your photos look more professional.
2. Symmetrical balance
Contrary to the Rule of thirds, the second one of those 7 photography tips - symmetrical balance, creates a sense of harmony and fascination by splitting the image space into evenly balanced segments with identical patterns and background. Photos applied the symmetrical composition such as a romantic path with long lines of trees either sides or dome structure, for example, can also be used to direct the viewers’ eyes to a single point at the end of the shot.
3. Pay attention to the exposure
Stable illumination is one of the most important photography tips to determine the success of a picture. Understanding the way to keep perfect light balance, you are likely to have achieved a huge step. In fact, it is far from difficult to acquire this proficiency.
A good exposure means a situation where there is a great combination in the light’s intensity between your subject and the surrounding element in the environment.
Remember that a mantra for a wonderful picture is a natural light source. An indoor photo usually can’t have the natural appealing color as an outdoor one. Even when there is a high level of artificial light. This is the reason why it is highly recommended that photography events should be organize outside during daytime. In the case of low light quality, move to a brighter place or turn on the night mode available in your camera. However, taking a flash often results in too strong contrast in the image. Therefore, take care to place it at a suitable distance in order to avoid regrettable mistakes.

Sunrise and sunset are always the best time of the day. Those periods of time help the image have moderate depth and contrast, not too harsh or underexposed like other moments. So, why don’t we take full advantage of them?
4. Use simple background
Choose simple backgrounds and avoid strong or elaborate patterns behind your subject if you have difficulty in scene arrangement and finding appropriate angles. Any items behind may distracts the attention of the viewers to the central character and induce an awesome clutter.
If possible, look for a plain background in which there is only one neutral color and no patterns. A single subject against a plain background will stand out better and make a stronger impression. This is especially vital in a shot where the model is placed off center.

If you're working on portraits, make sure there are no unnecessary objects sticking out of your subject's body. Unless it is a deliberate addition to the shot for a certain purpose such as conveying messages, ideas or creativity. If you're working with plants and flowers, try creating your own backgrounds out of card and material. This can be slipped into your bag alongside your camera gear.
Taking photos from a low angle of blue sky, especially on a cloudless day or night is a great example. By this, you will get a dreamlike, youthful plain background which is quite hard to gain from others. A long fence or an immense grassland will provide you with an effective plain background as well.
View more about Photography
5. Consider a tripod
A suitable tripod is worth getting. Especially if shooting in low light conditions, at slower shutter speeds to capture motion blur, or if you have shaky hands. For even more stability, use your camera’s timer function with a tripod.
Trying a tripod and your satisfaction will skyrocket. The important thing is to understand how to arrange the tripod installation in the right position. Then place it in the most balanced position to stabilize the camera during shooting. and the tripod does not to be a loath distraction.

6. Use contrast
Contrast in photography is the visual ratio of different factors in a particular image. They are in terms of what creates the structures, colors, focal length, light exposure, ...
A high contrast level among key subjects or auxiliary items, or between key subjects and the auxiliary items in the background will naturally draw everybody’ s attention to that picture, especially when it comes to portrait.
Color contrast reflects how colors interact with one another. We can easily perceive contrast colors based on their position on the color wheel. The way color characteristics accentuate each other defines the image’s contrast appearance. Think of a landscape shot — the dull colors are lower in contrast and the vibrant colors are higher. Which state are you more excited about? Definitely the latter one, right? This composition also helps to create the emotion of a photo. You can make an image more vivid and cheerful by a combination of opposite colors. Red and green, yellow and blue, …are great examples for this. This is also one of the most useful photography tips you can acquire promptly.

7. Practice makes perfect
Last but not least, practicing more and more is the most crucial factor to gain promotion. Getting shaky, blurry or badly handles photos can be frustrating and discourage you. Nevertheless, it is necessary to keep them as a way to encourage ourselves to be more industrious and skillful.
Therefore, don’t immediately hit the delete button whenever you get a bad photo. Instead, spend time studying to work out what went wrong and how to improve it. You will gradually see a difference in the images when time goes by. Practice as much as possible and you ultimately master photographic skills and control your own camera. It’s efforts which will help you achieve success. As Albert Enstein affirmed: “Genius is 1% talent and 99% percent hard work...”
 alt="">
 alt="">
 alt="">
 alt="">
 alt="">
 alt="">
 alt="">